Configuring CI pipeline in Jenkins for PHP projects
This article describes the process of creating a CI (Continuous Integration) pipeline for PHP projects using Jenkins server.
The Architecture
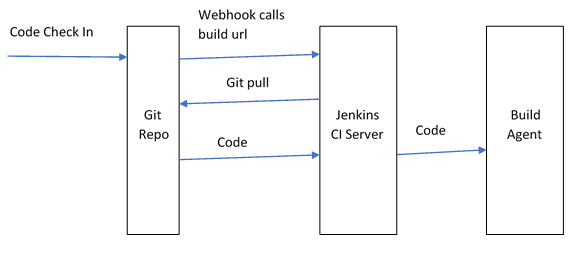
The above diagram shows a graphical representation of the whole process. Here we have a git repo, the Jenkins CI server, and its build agent.
The Process
- The process begins when the user checks in the code in the git repo. The git repo via its commit hook calls the build URL of Jenkins server.
- The Jenkins server pulls the code from the git repo and sends it to build agent.
- The build agent then executes the ant script and builds and validates the PHP code via various validations mentioned the ant script
- The successful build can be deployed in a deployment server to complete the CD part of the process.
The configuration
To configure this solution, we have used a Microsoft Team Foundation Server Online git repo and a Bitnami Jenkins server VM from Azure. I am assuming you already have a VS Online account and Azure account. I am also assuming, that you have some level of familiarity with VS Online and Azure. In the following sections, we have shown how to configure each of the items.Create A VS Online Project

Configure credentials for your repo

After the project is created click on set password in the getting started page and you should be able to set the username and password for the git repo. You would need this to check in your code in the git repo from a non-vs/windows environment. You would also need this credential later in Jenkins to configure the repo.
Create the Jenkins VM From Azure

I have used the Bitnami Jenkins VM for this scenario. You can choose any other Jenkins server offering as per your need.

You can see the above screenshot for the configuration that I have used for my VM.
Setting up Jenkins with plugins

Once the VM is ready you can visit the Jenkins URL to complete the setup. It would ask you to install the suggested plugins. Git plugin is one of the suggested plugins. So, you can just select yes here. After the installation is completed. It would reboot and you create the password for user “user”. You can see the password from the boot log.

Project Creation

You need to select a freestyle project. Give it a name.

After you save the project go to the project settings and select git as source control and provide it with the credentials that you create the in TFS Online git repo. This will allow the Jenkins git to pull the code from the TFS git repo.
Get API token

You would need to get your access token from your account. You would need this to configure the build URL. You can get this from your account settings.
Use Access token to create build URL

From project setting -> build trigger - This is where you need to paste the API token found in the user configuration.
Configure Trigger in TFS Online
TFS Online has service hooks which allow the user to auto generate various actions for a repo. In case you need to use any other git repo you may find similar functionality. Or you may need to call the build URL we got in the previous section on code push hook of the git repo.
Now we need to configure the code check-in trigger in the VS Online repo. To do that, follow the images.

Here the service hook would need to be selected as per the picture below

In the next screen


In the next step enter the details as required.
At this point, if you do a code push in your TFS online repo your code should be automatically pulled in Jenkins. But since we have not configured anything else. There will be no code validation for the PHP project.
The PHP Project
I have the sample PHP project present at
Download this project in your local directory. Add this project to your remote git repo and push the code to the server. The code would be sent to the Jenkins server and you should see a successful build if everything is configured properly. Now we need to setup ant in the box for PHP project automation.
Configure Ant in Jenkins

From the global settings of Jenkins select Ant installer as per the settings are given in the pic. This would automatically download and install Ant on the Jenkins server.

Go to project settings. In the build section, add build step as Invoke Ant. Provide the details as given.
So, at this moment when you push your code to the server, Jenkins would run the ant build script in the code. But chances are the code would fail, as the build script would need the following tools to be in the path.
- Phpab
- Phploc
- Pdepend
- Phpmd
- Phpcs
- Phpcpd
- Phpunit
- Phpdox
For each tool, you can download the “.phar” file from the respective websites and copy them in the
/usr/local/bin
folder.
A typical output of the ant build looks something like this


Comments